Note: this BIOS update ONLY applies to the following models: CSG750 and CSG770.
The following procedure requires serial console access and physical access to boot the system from a USB flash drive.
Latest BIOS version: V121 (build date 07/29/2025)
Step 1:
Download BIOS update package from the link below.
filename: CSG700_BIOS_V121_PKG_EFI.zip
https://versanetworks.box.com/s/o0t825dju77l1hlgvfn31sdjftelre1a
Step 2:
Verify current system DMI info and record the system model, SKU and serial number.
After BIOS update, system DMI SKU and Serial info need to be reprogrammed.
[admin@versa-flexvnf: ~] $ sudo dmidecode -t 1
# dmidecode 3.1
Getting SMBIOS data from sysfs.
SMBIOS 3.0.0 present.
Handle 0x0001, DMI type 1, 27 bytes
System Information
Manufacturer: Versa Networks, Inc.
Product Name: CSG750
Version: V0.1
Serial Number: JAB19260896
UUID: 03000200-0400-0500-0006-000700080009
Wake-up Type: Power Switch
SKU Number: CSG750-WLA-4GP
Family: Default string
Step 3:
Verify current system BIOS
[admin@versa-flexvnf: ~] $ sudo dmidecode -t 0
[sudo] password for admin:
# dmidecode 3.1
Getting SMBIOS data from sysfs.
SMBIOS 3.0.0 present.
Handle 0x0000, DMI type 0, 24 bytes
BIOS Information
Vendor: American Megatrends Inc.
Version: FNCAVS2511B006V115
Release Date: 03/12/2019
Address: 0xF0000
Runtime Size: 64 kB
ROM Size: 8192 kB
Characteristics:
Step 4:
Verify current MAC addresses
admin@versa-flexvnf-cli> show interfaces brief | tab | nomore
NAME MAC OPER ADMIN TENANT VRF IP
-----------------------------------------------------------------------------------------
eth-0/0 ac:43:30:95:74:de up up 0 global 10.10.10.10/8
tvi-0/0 n/a up up - -
tvi-0/0.0 n/a up up 1 Versa-Provider-Control-VR
tvi-0/1 n/a up up - -
tvi-0/1.0 n/a up up 1 Versa-Provider-Control-VR
vni-0/0 ac:43:30:95:74:e1 down up - -
vni-0/0.1 ac:43:30:95:74:e1 down up 1 WAN1-Transport-VR
vni-0/0.0 ac:43:30:95:74:e1 down up 1 WAN1-Transport-VR
vni-0/1 ac:43:30:95:74:e2 down up - -
vni-0/1.1 ac:43:30:95:74:e2 down up 1 WAN1-Transport-VR
vni-0/1.0 ac:43:30:95:74:e2 down up 1 WAN1-Transport-VR
vni-0/100 02:aa:bb:cc:dd:01 down up - -
vni-0/100.0 02:aa:bb:cc:dd:01 down up 1 WAN1-Transport-VR
vni-0/101 02:aa:bb:cc:dd:02 down up - -
vni-0/101.0 02:aa:bb:cc:dd:02 down up 1 WAN1-Transport-VR
vni-0/102 02:aa:bb:cc:dd:03 down down - -
vni-0/103 02:aa:bb:cc:dd:04 down down - -
vni-0/2 ac:43:30:95:74:df down up - -
vni-0/2.0 ac:43:30:95:74:df down up 1 global 192.168.1.1/24
vni-0/3 ac:43:30:95:74:e0 down up - -
vni-0/3.0 ac:43:30:95:74:e0 down up 1 global 192.168.2.1/24
vni-0/4 ac:43:30:95:74:dd down up - -
vni-0/4.1 ac:43:30:95:74:dd down up 1 WAN1-Transport-VR
vni-0/4.0 ac:43:30:95:74:dd down up 1 WAN1-Transport-VR
[ok][2025-08-05 15:56:51]
admin@versa-flexvnf-cli>
Step 5:
Format a USB flash drive to FAT32

Step 6:
Extract the BIOS update package zip file and copy the contents to the USB root directory.
Step 7:
Plug in the USB to CSG700.
Reboot the system and go to BIOS setup.
To go to BIOS setup, on serial consoel, press "Del" key at the boot up BIOS post screen as shown below.
Boot Bios: Primary BIOS
Version 2.19.1266. Copyright (C) 2025 American Megatrends, Inc.
NCA-VS2511B BIOS V1.21(07/29/2025)
Press <Tab> or <DEL> to enter setup.
Entering Setup...
Step 8:
In BIOS, go to "Boot" menu.
Set "Boot mode select" to "DUAL".
Set "Boot Option #1" to "UEFI USB Device"
Aptio Setup Utility - Copyright (C) 2019 American Megatrends, Inc.
Main Advanced IntelRCSetup Security Boot Save & Exit
/----------------------------------------------------+-------------------------\
| Boot Configuration ^|Select boot mode |
| Setup Prompt Timeout 5 *|LEGACY/UEFI |
| Bootup NumLock State [On] *| |
| Quiet Boot [Disabled] *| |
| *| |
| Boot mode select [DUAL] *| |
| *| |
| FIXED BOOT ORDER Priorities *| |
| Boot Option #1 [UEFI USB Device:UEFI: *| |
| Generic Flash Disk *|-------------------------|
| 8.07, Partition 1] *|><: Select Screen |
| Boot Option #2 [UEFI Hard Disk] *|^v: Select Item |
| Boot Option #3 [UEFI CD/DVD] *|Enter: Select |
| Boot Option #4 [UEFI Network] +|+/-: Change Opt. |
| Boot Option #5 [USB Device:Generic +|F1: General Help |
| Flash Disk 8.07] +|F2: Previous Values |
| Boot Option #6 [Hard Disk: M.2 (S42) +|F3: Optimized Defaults |
| 3ME4] v|F4: Save & Exit |
| |ESC: Exit |
\----------------------------------------------------+-------------------------/
Version 2.19.1266. Copyright (C) 2019 American Megatrends, Inc.
Step 9:
Go to BIOS "Save & Exit" menu and select "Save Changes and Reset".
System will reboot into USB in UEFI mode.
Aptio Setup Utility - Copyright (C) 2019 American Megatrends, Inc.
Main Advanced IntelRCSetup Security Boot Save & Exit
/----------------------------------------------------+-------------------------\
| Save Options |Reset the system after |
| Discard Changes and Exit |saving the changes. |
| Save Changes and Reset | |
| | |
| Default Options | |
| Restore Defaults | |
| | |
| Boot Override | |
| Generic Flash Disk 8.07 | |
| P2: M.2 (S42) 3ME4 |-------------------------|
| Launch EFI Shell from filesystem device |><: Select Screen |
| |^v: Select Item |
| |Enter: Select |
| |+/-: Change Opt. |
| |F1: General Help |
| |F2: Previous Values |
| |F3: Optimized Defaults |
| |F4: Save & Exit |
| |ESC: Exit |
\----------------------------------------------------+-------------------------/
Version 2.19.1266. Copyright (C) 2019 American Megatrends, Inc.
Step 10:
System should reboot into USB in UEFI model and USB should be detected in UEFI mode.
At EFI shell prompt, type in the USB device name (e.g. fs0:) as shown below.
EFI Shell version 2.60 [5.13]
Current running mode 1.1.2
Device mapping table
fs0 :Removable HardDisk - Alias hd23c0b blk0
PciRoot(0x0)/Pci(0x15,0x0)/USB(0x2,0x0)/HD(1,MBR,0x00000000,0x800,0xF3B7E0)
blk0 :Removable HardDisk - Alias hd23c0b fs0
PciRoot(0x0)/Pci(0x15,0x0)/USB(0x2,0x0)/HD(1,MBR,0x00000000,0x800,0xF3B7E0)
blk1 :HardDisk - Alias (null)
PciRoot(0x0)/Pci(0x13,0x0)/Sata(0x2,0xFFFF,0x0)/HD(1,MBR,0xA51FD04C,0x800,0x7740000)
blk2 :BlockDevice - Alias (null)
PciRoot(0x0)/Pci(0x13,0x0)/Sata(0x2,0xFFFF,0x0)
blk3 :Removable BlockDevice - Alias (null)
PciRoot(0x0)/Pci(0x15,0x0)/USB(0x2,0x0)
Press ESC in 4 seconds to skip startup.nsh, any other key to continue.
Shell> fs0:
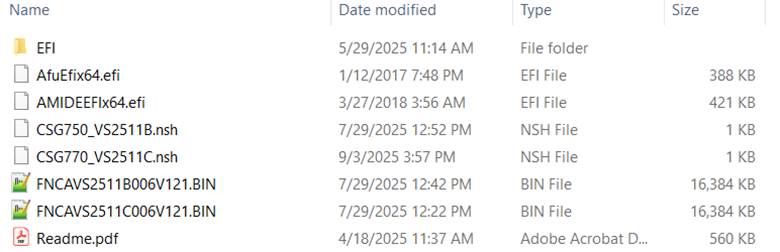
Step 11:
Verify that BIOS update files are available in the USB as shown below.
fs0:\> ls
Directory of: fs0:\
05/29/25 11:14a <DIR> 4,096 EFI
01/12/17 08:48p 396,400 AfuEfix64.efi
07/29/25 12:52p 51 CSG750_VS2511B.nsh
09/03/25 03:57p 51 CSG770_VS2511C.nsh
07/29/25 12:42p 16,777,216 FNCAVS2511B006V121.BIN
07/29/25 12:22p 16,777,216 FNCAVS2511C006V121.BIN
04/18/25 11:37a 572,520 Readme.pdf
03/27/18 03:56a 430,704 AMIDEEFIx64.efi
7 File(s) 34,954,158 bytes
1 Dir(s)
fs0:\>
Step 12:
NOTE: different model/sku uses different BIOS image and update script.
To update CSG750 BIOS, run the script "CSG750_VS2511B.nsh"
To update CSG770 BIOS, run the script "CSG770_VS2511C.nsh"
Example using CSG750:
fs0:\>
fs0:\> CSG750_VS2511B.nsh
CSG750_VS2511B.nsh> AfuEfix64 FNCAVS2511B006V121.BIN /p /b /n /x /k
+---------------------------------------------------------------------------+
| AMI Firmware Update Utility v5.09.01.1317 |
| Copyright (C)2017 American Megatrends Inc. All Rights Reserved. |
+---------------------------------------------------------------------------+
Reading flash ............... done
- ME Data Size checking . ok
Secure Flash enabled, recalculate ROM size with signature... Enable.
- FFS checksums ......... ok
- Check RomLayout ......... Ok.
Loading capsule to secure memory buffer ... done
Erasing Boot Block .......... done
Updating Boot Block ......... done
Verifying Boot Block ........ done
Erasing Main Block .......... done
Updating Main Block ......... done
Verifying Main Block ........ done
Erasing NVRAM Block ......... done
Updating NVRAM Block ........ done
Verifying NVRAM Block ....... done
Erasing NCB Block ........... done
Updating NCB Block .......... done
Verifying NCB Block ......... done
fs0:\>
Step 13:
Reprogram DMI info system sku and serial number info as shown in the example below.
To program DMI system sku:
fs0:\> AMIDEEFIx64.efi /sk "<System SKU>"
To program DMI system serial:
fs0:\> AMIDEEFIx64.efi /ss "<System serial>"
Replace <System SKU> and <System serial> with correct system sku and serial accordingly.
Example:
fs0:\> AMIDEEFIx64.efi /sk "CSG750-WLA-4GP"
+---------------------------------------------------------------------------+
| AMIDEEFI64 Utility v5.19.0015 |
| Copyright (C)2017 American Megatrends Inc. All Rights Reserved. |
+---------------------------------------------------------------------------+
Initializing the SMBIOS interface. Please wait a moment......
Name R/W Status Information
-------------------------- --- ------ ----------------------------------
(/SK)System SKU number W Done "CSG750-WLA-4GP"
fs0:\> AMIDEEFIx64.efi /ss "JAB19260896"
+---------------------------------------------------------------------------+
| AMIDEEFI64 Utility v5.19.0015 |
| Copyright (C)2017 American Megatrends Inc. All Rights Reserved. |
+---------------------------------------------------------------------------+
Initializing the SMBIOS interface. Please wait a moment......
Name R/W Status Information
-------------------------- --- ------ ----------------------------------
(/SS)System Serial number W Done "JAB19260896"
Step 14:
Rebot the system
fs0:\> reset
Step 15:
After system is rebooted, verify the system DMI info:
[admin@versa-flexvnf: ~] $ sudo dmidecode -t 1
# dmidecode 3.1
Getting SMBIOS data from sysfs.
SMBIOS 3.0.0 present.
Handle 0x0001, DMI type 1, 27 bytes
System Information
Manufacturer: Versa Networks, Inc.
Product Name: CSG750
Version: V0.1
Serial Number: JAB19260896
UUID: 03000200-0400-0500-0006-000700080009
Wake-up Type: Power Switch
SKU Number: CSG750-WLA-4GP
Family: Default string
Step 16:
Verify the updated system BIOS:
[admin@versa-flexvnf: ~] $ sudo dmidecode -t 0
# dmidecode 3.1
Getting SMBIOS data from sysfs.
SMBIOS 3.0.0 present.
Handle 0x0000, DMI type 0, 24 bytes
BIOS Information
Vendor: American Megatrends Inc.
Version: FNCAVS2511B006V121
Release Date: 07/29/2025
Address: 0xF0000
Runtime Size: 64 kB
ROM Size: 8192 kB
Characteristics:
Step 17:
Verify MAC addresses are still intact after BIOS update.
admin@versa-flexvnf-cli> show interfaces brief | tab | nomore
NAME MAC OPER ADMIN TENANT VRF IP
-----------------------------------------------------------------------------------------
eth-0/0 ac:43:30:95:74:de up up 0 global 10.10.10.10/8
tvi-0/0 n/a up up - -
tvi-0/0.0 n/a up up 1 Versa-Provider-Control-VR
tvi-0/1 n/a up up - -
tvi-0/1.0 n/a up up 1 Versa-Provider-Control-VR
vni-0/0 ac:43:30:95:74:e1 down up - -
vni-0/0.1 ac:43:30:95:74:e1 down up 1 WAN1-Transport-VR
vni-0/0.0 ac:43:30:95:74:e1 down up 1 WAN1-Transport-VR
vni-0/1 ac:43:30:95:74:e2 down up - -
vni-0/1.1 ac:43:30:95:74:e2 down up 1 WAN1-Transport-VR
vni-0/1.0 ac:43:30:95:74:e2 down up 1 WAN1-Transport-VR
vni-0/100 02:aa:bb:cc:dd:01 down up - -
vni-0/100.0 02:aa:bb:cc:dd:01 down up 1 WAN1-Transport-VR
vni-0/101 02:aa:bb:cc:dd:02 down up - -
vni-0/101.0 02:aa:bb:cc:dd:02 down up 1 WAN1-Transport-VR
vni-0/102 02:aa:bb:cc:dd:03 down down - -
vni-0/103 02:aa:bb:cc:dd:04 down down - -
vni-0/2 ac:43:30:95:74:df down up - -
vni-0/2.0 ac:43:30:95:74:df down up 1 global 192.168.1.1/24
vni-0/3 ac:43:30:95:74:e0 down up - -
vni-0/3.0 ac:43:30:95:74:e0 down up 1 global 192.168.2.1/24
vni-0/4 ac:43:30:95:74:dd down up - -
vni-0/4.1 ac:43:30:95:74:dd down up 1 WAN1-Transport-VR
vni-0/4.0 ac:43:30:95:74:dd down up 1 WAN1-Transport-VR
[ok][2025-08-05 15:56:51]
admin@versa-flexvnf-cli>
<DONE>
BIOS release notes:
V121 (build date 07/29/2025):
- Added BIOS watchdog feature for SSD detection during system boot up.
V117 (build date 03/31/2021):
- Added support for NIC-8GE (8-port GbE NIC)
V115 (build date 03/12/2019):
- Production release